Challenge A – Comic Prototyp
Dec 3rd, 2025 / / 0 Comments
Phase 1: Understand
When I first learned about computers, building a PC sounded intimidating: handling delicate components, being scared of static electricity, and accidentally breaking something. I chose this topic because I know many beginners-especially students who want either to get into gaming or upgrade their study setup-feel this way. The comic format allows me to simplify such a complex process with visuals, humor, and step-by-step clarity. My aim is to de-mystify PC building so that anyone can confidently put together their system, without having prior experience.
THE CHALLENGE:
First-time computer builders often feel intimidated by the process of assembling a PC. With so many components, cables, and warnings about “frying your parts,” the process can feel overwhelming. My challenge is to design a step-by-step comic that demystifies PC building, making it approachable, safe, and fun for beginners.
CONTEXT AND AUDIENCE:
My ideal audience is high school and university students aged 16–24 years, interested in technology, gaming, or upgrading their study setup but have never built a computer before.
These learners devour tech tutorials on YouTube or TikTok, but most of those formats are either too fast, overly technical, or filled with distractions. The comic medium lets me break the process down into small, digestible bits (segmenting principle) while the learning remains visual and engaging.
Psychographically, this is an audience that prizes independence and self-sufficiency. Building a PC is not only cost-effective but also a source of pride. Behaviourally, they learn comfortably from visuals and short captions, perfect for a comic format.
POV STATEMENT:
Novice PC builders should have a clear, step-by-step manner of learning the assembly process so that they can confidently build their system without feeling overwhelmed or making costly mistakes.
Frustrations: Fear of breaking expensive parts, confusing technical jargon, and inconsistent advice from online tutorials.
Motivations: saving money, building something with their hands, and having a computer that fits their personal needs, whether for gaming, creative work, or studies.
LEARNING OBJECTIVES:
Primary Objective: The beginner will be able to identify major PC components and understand the safe, step-by-step sequence of assembly.
Secondary Goals:
- Identify safety practices: anti-static precautions, cable management.
- Learn to connect critical power and data cables correctly.
- Know the installation order: CPU, cooler, RAM, storage, case preparation, motherboard, PSU, GPU, first boot.
- Gain confidence to troubleshoot a “first boot” by entering BIOS successfully.
Hidden Agenda: Develop problem-solving skills that are transferable and engender confidence to undertake other practical technical projects.
Real-World Benefit: In addition to understanding how to build a single PC, students will develop the confidence to upgrade or repair systems in the future, essential life skills for anyone in the digital age.
Phase 2: The Plan & Prototype
My first thought was to choose a university-related or “soft skills” topic like many of my peers, but it then occurred to me that PC building is something both educational and practical: it teaches sequencing, safety, and technical literacy.
I experimented with the idea of a text-based tutorial but decided that it really needs visuals. A comic not only reduces extraneous cognitive load but also makes the process feel less intimidating. Each panel can focus on one micro-action, such as installing RAM, without overwhelming the learner. My storyline would be a “helpful guide” character who might walk the reader through and allow the instructions to be supportive and entertaining.
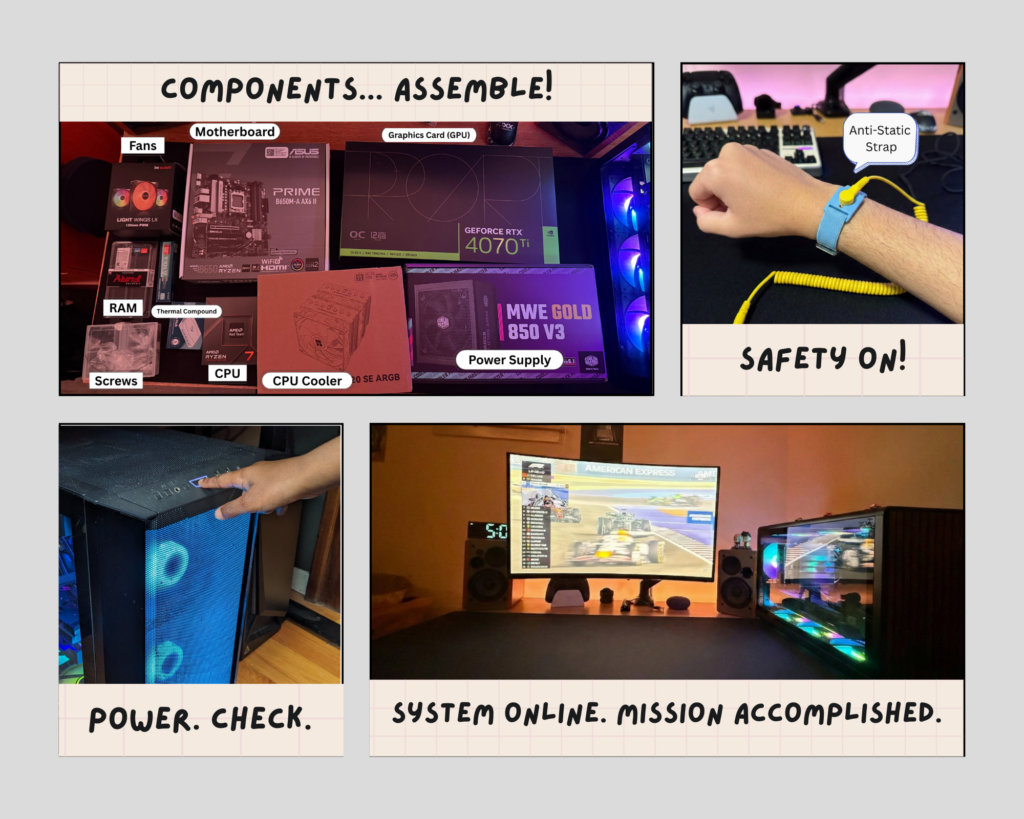
Storyboard: Build a PC (16 Panels)
Panel 1 – The Parts
- Visual: Wide desk shot, all components (CPU, motherboard, RAM, SSD, GPU, PSU, case, cooler, cables, tools) arranged neatly. Labels above each.
- Text: “Meet your PC parts—each has a job to do.”
Panel 2 – Workspace Prep
- Visual: Clean table, screwdriver, parts tray, side panel removed from case.
- Text: “Step 1: Clear your desk. Keep screws in a tray.”
Panel 3 – Static Safety
- Visual: Builder touches the case frame with one hand, small ⚡ icon crossed out.
- Text: “Ground yourself to avoid static electricity.”
Panel 4 – CPU Install
- Visual: Close-up of CPU above motherboard socket, golden triangle aligned with socket corner.
- Text: “Match the triangles—drop in gently, no force!”
Panel 5 – Secure CPU
- Visual: Socket lever being lowered to lock CPU in place.
- Text: “Close the lever to secure the CPU.”
Panel 6 – Thermal Paste
- Visual: Small pea-sized dot of paste centered on CPU.
- Text: “Add a pea of thermal paste.”
Panel 7 – Cooler Install
- Visual: Cooler lowered onto CPU, screws tightened diagonally (X pattern arrows).
- Text: “Lower the cooler. Tighten screws in an X pattern.”
Panel 8 – RAM Sticks
- Visual: Open DIMM slots 2 & 4, RAM lined up above.
- Text: “Line up RAM notch, press firmly until it clicks.”
Panel 9 – NVMe SSD
- Visual: M.2 drive angled into slot, small screw ready.
- Text: “Insert at an angle, press flat, secure with screw.”
Panel 10 – Case Prep
- Visual: Empty case, brass standoffs installed, I/O shield snapped in.
- Text: “Install standoffs & I/O shield before the board goes in.”
Panel 11 – Motherboard Install
- Visual: Motherboard lowered into case, screws going into standoffs.
- Text: “Lower board gently, align I/O, screw it down.”
Panel 12 – PSU Install
- Visual: PSU in case bottom, fan facing vent.
- Text: “Install PSU—make sure the fan faces the vent.”
Panel 13 – Main Power Cables
- Visual: 24-pin cable plugged into board, 8-pin CPU power routed to top.
- Text: “Connect the 24-pin and CPU 8-pin power.”
Panel 14 – GPU Install
- Visual: GPU lowered into top PCIe slot, latch closing.
- Text: “Seat GPU into the top PCIe slot. Secure with screws.”
Panel 15 – Cable Management
- Visual: Backside of case, zip ties bundling cables neatly.
- Text: “Tie down cables to keep airflow clear.”
Panel 16 – First Boot
- Visual: PC turned on, BIOS screen glowing on monitor.
- Text: “Moment of truth! Power on & enter BIOS with DEL key.”
PRINCIPLES APPLIED:
- Coherence Principle: Each panel focuses on one clear action, avoiding clutter or off-topic info.
- Segmenting Principle: Steps are broken into manageable chunks to reduce intrinsic load.
- Contiguity Principle: Labels and arrows are directly next to components for easy identification.
- Personalization Principle: Conversational captions guide the learner as if a friend is walking them through.
- Dual Coding: Images carry most of the meaning, while short captions provide clarification.
Sample Panels:
Phase 3: Feedback & Iteration
PEER FEEDBACK
Hey Tanuj, Your comic prototype is pretty impressive and demonstrates a clear vision for making PC building approachable to almost anyone. You’ve defined the challenge and audience well and explain why your comic format suits your goal. The storyboard is also strong and I like how each step is broken into simple actions that guide readers from workspace prep to getting it started. I also like how each panel focuses on a single action, keeping everything clear and easy to follow. With this being said I have some feedback to make it even better. Firstly, one thing you could do is prior to beginning the building process address each component and its use. This would give readers a better idea of what it is they’re actually putting together. Next I would consider giving your “helpful guide” character more personality through different comments or reassurances, such as reminding readers not to worry if a part doesn’t fit immediately. Including one or two of the most common mistakes could also help learners troubleshoot and stay motivated when they face issues during the building process. Lastly, instead of stopping at the BIOS screen, you could close with an invitation for readers to imagine how they’ll use their new PC, whether its for videogames, research etc. This could add to the overall excitement. Like I said, this is already a strong prototype. Hopefully my suggestions could make it even stronger.
My future updates/understanding of the feedback:
I received encouraging feedback that my comic prototype is clear and approachable, with each step broken into simple, digestible actions. My peer also suggested several ways to strengthen the design:
- Add a component overview: Introduce what each part does before starting assembly.
- Give the guide more personality: Use humor, encouragement, and reassurances to keep learners motivated.
- Include common mistakes: Show one or two troubleshooting scenarios (e.g., RAM not fully seated) so readers feel prepared if things don’t go smoothly.
- End with an invitation: Instead of stopping at the BIOS, close with a panel that encourages readers to imagine using their PC for gaming, schoolwork, or creative projects.
In my revision, I plan to incorporate these changes by adding a short “meet the parts” panel, expanding the guide’s dialogue, and designing an ending that leaves the reader excited about their finished system.
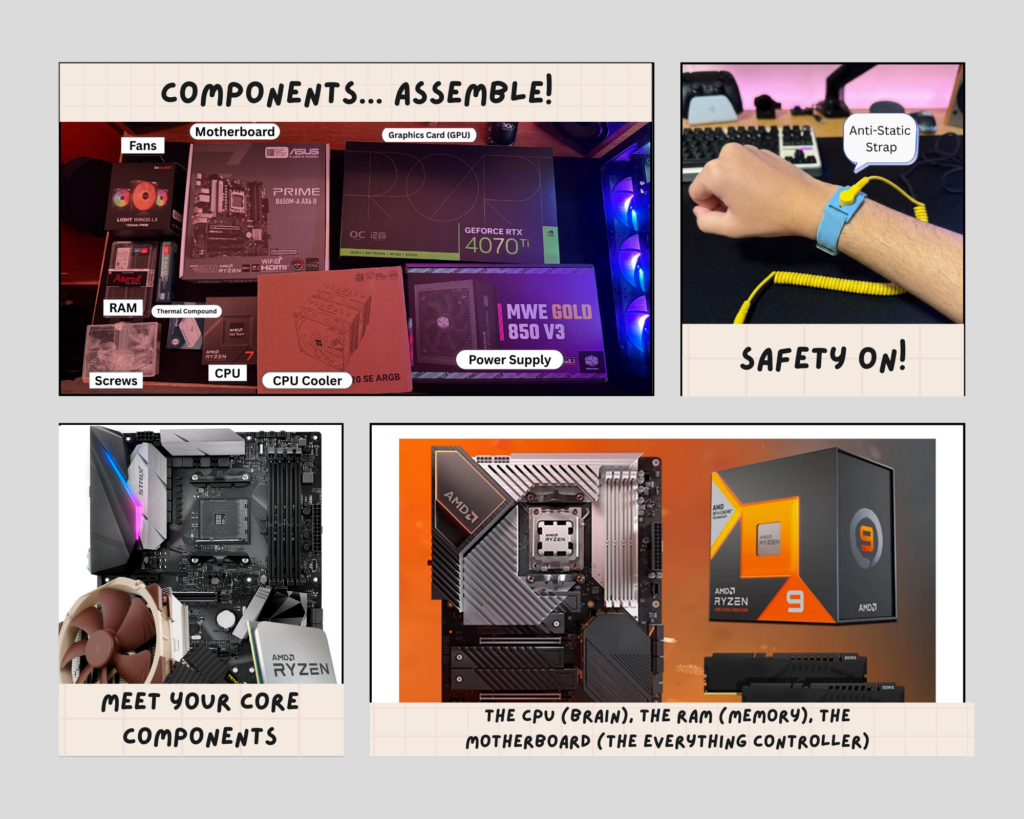
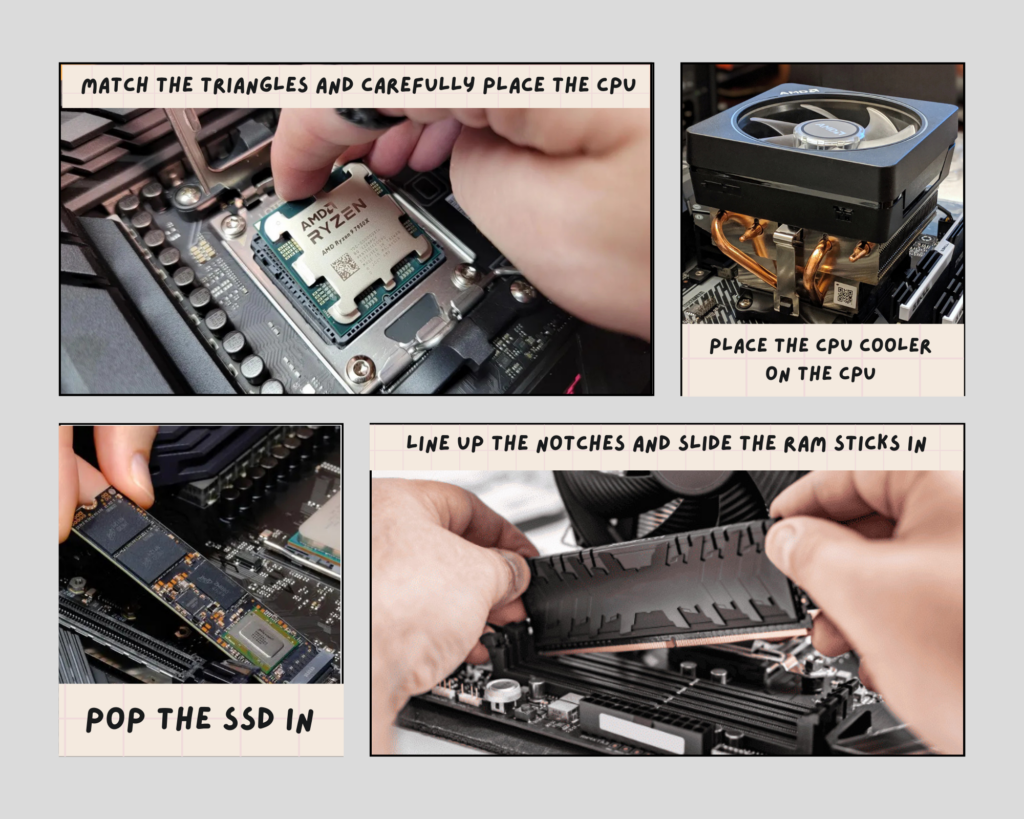
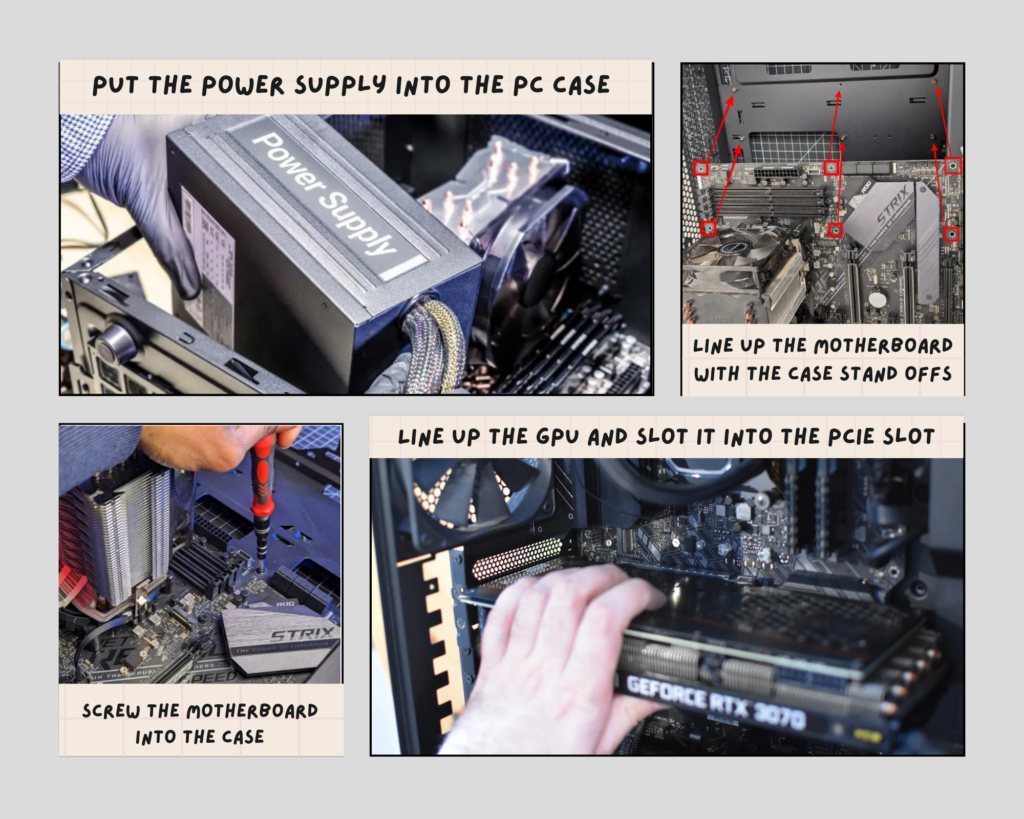
Phase 4: The Final Comic (16 Panels)
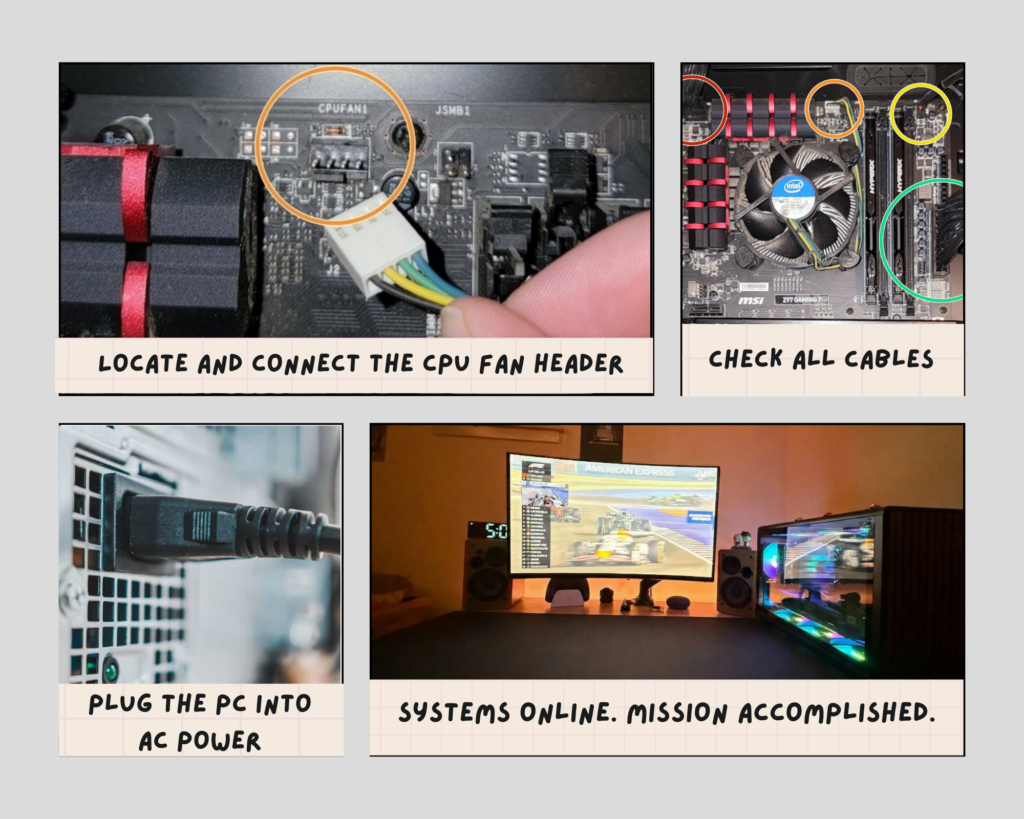
Phase 5: Reflection
For this revised submission, I moved entirely away from AI image generation. Instead, I used a “Collage/Remix” approach or more commonly known as a photo comic.
I realized that while AI is fast, it often hallucinates details (like putting pins in the wrong place on a CPU). By manually curating images, some I took myself, others I carefully selected from technical guides, I could ensure the Coherence Principle was met. The visuals are now accurate and safe for a learner to follow.
The process of manually overlaying the text and arranging the layout in Canva gave me much more control over the Dual Coding aspect, ensuring the text labels pointed exactly to the right cable or slot, which is difficult to achieve with GenAI.
Statement of AI Use & Attribution
- Text Content: I wrote the blog post, script, and reflection entirely myself without AI assistance.
- Comic Visuals: The final comic is a manual collage created in Canva. It combines my own photography with fair-use educational images sourced from technical guides (sources listed below). No Generative AI images were used.
- Concept: The narrative is based on my personal experience building my own PC.
Canva Documents can be accessed here:
Final Comic: https://www.canva.com/design/DAG6fAvyKZs/K7_zU4vGNHeJC8O0pUYaDg/view?utm_content=DAG6fAvyKZs&utm_campaign=designshare&utm_medium=link2&utm_source=uniquelinks&utlId=h4416bc97fc
Sample Storyboard: https://www.canva.com/design/DAG6cc7T52k/u5lGOnCJOQD5NUjMD2BDsg/view?utm_content=DAG6cc7T52k&utm_campaign=designshare&utm_medium=link2&utm_source=uniquelinks&utlId=h8eb752c8f0
References for Final Comic:
Image Source for Panel 1: Shot by Blog Author
Image Source for Panel 2: Shot by Blog Author
Image Source for Panel 3 (core components panel): https://quietpc.ca/sys-bundle-ryzen-atx
Image Source for Panel 4: https://softwareg.com.au/blogs/computer-hardware/amd-motherboard-cpu-combo-deals
Panel 5: https://www.tomshardware.com/how-to/install-a-cpu
Panel 6: https://nz.pcpartpicker.com/b/HYsXsY
Panel 7: https://www.techradar.com/computing/computing-components/youll-be-paying-much-more-for-ssd-cards-this-year-heres-why
Panel 8: https://techguided.com/how-to-install-ram-in-your-pc/
Image Source for Panel 9: https://www.howtogeek.com/835337/can-you-use-two-power-supplies-with-one-computer/
Panel 10: https://beebom.com/how-install-motherboard-pc-case/
Image Source for Panel 11: https://beebom.com/how-install-motherboard-pc-case/
Image Source for Panel 12: https://www.google.com/url?sa=i&url=https%3A%2F%2Fciriloehansen.com.br%2F%3Fb%3D53423661051850&psig=AOvVaw3pj1WpedOWFtuloSvDqx0w&ust=1764893478997000&source=images&cd=vfe&opi=89978449&ved=0CBEQjRxqFwoTCMi8jZXTopEDFQAAAAAdAAAAABAE
Panel 13: https://www.ifixit.com/Guide/Connecting+Cables+to+the+Motherboard/168385
Image Source for Panel 14: https://www.ifixit.com/Guide/Connecting+Cables+to+the+Motherboard/168385
Panel 15: https://www.wiringo.com/power-cables.html
Panel 16: Shot by Blog Author